Best Google Pixel 7 cases in 2024

The Google Pixel 7 has been hailed as “the most refined Pixel yet.” That sounds like the kind of smartphone you take extra care of and pamper with a new, durable case. After all, you’ll want that Google Tensor G2-powered device kept in one piece at least until you feel it’s time to upgrade to the Google Pixel 8. A case may cover up the phone’s elegant design, but luckily, some options can enhance its visual appeal or speak more to your personality.
While on the topic of protecting one of the finest 5G-capable smartphones on the market, that 90Hz 1080×2400 FHD+ screen is worthy of its own security. Consider installing a durable TPU or tempered glass screen protector to get the job done. The right pairing of a sturdy screen protector and a case will keep your Google Pixel 7 in pristine condition.
-

Spigen Liquid Air for Pixel 7
Best overall$18 $20 Save $2True to its name, the Liquid Air is a form-fitting case that it feels like it isn’t even there. There’s little to it, apart from the geometric design motif, but that doesn’t mean it lacks protective strength. On the contrary, it incorporates air cushioning to cradle your phone from drops. It now comes in Navy-Blue, too.
-

dbrand Grip case For Pixel 7
Premium pickIf you’re after a case that commands attention, Dbrand’s premium Grip is the answer. Whether you opt for the boldness of Warzone, with its eyeball-searing contrast, or opt for the simpler visuals of Solstice, your Pixel 7 transforms into a work of art. Thanks to its rugged edges and robust plastic shell, it shrugs off nasty impacts.
-
Caseology Parallax for Pixel 7
Best value$18 $27 Save $9Caseology has built a reputation upon crafting some of the most distinctive phone cases available. The Parallax, in addition to offering military-grade phone protection, features striking geometric patterns on the back that enhance grip. We love the flattened cubic design and the classy bronze strip, plus those screen-protecting lifted edges.
-
i-Blason Cosmo Series for Pixel 7
Promoted pickIn partnership with i-Blason
The Cosmo case for the Pixel 7 is structured geometrically, yet it looks stylish and pretty. Besides the tiled marbling effect, it offers robust drop protection of up to 10 feet. TPU is added to repel scratches and scrapes. Finally, it has a built-in screen protector that won’t interfere with your fingerprint ID.
-

OtterBox Defender Series Case for Pixel 7
$40 $65 Save $25This case features a robust construction consisting of four layers meticulously engineered by OtterBox. These layers work together to provide optimal security and protection for your phone. More importantly, the case has been drop-tested to meet military standards. Ultimately, the polycarbonate shell protects against shock, while the outer slipcase delivers lots of grip.
-

Peak Design Everyday for Pixel 7
Peak Design, peak ethics. The Everyday case looks sharp while being made from recycled fibers to reduce the company’s environmental impact. It’s also compatible with other Peak Design mounts and accessories, so with the Everyday you’re buying your way into their full smartphone/MagSafe ecosystem.
-
Tudia Merge Series DualShield For Pixel 7
Testing has shown that the Tudia Merge can successfully endure 26 consecutive drops from waist height, all without causing harm to the cherished Pixel 7 it cradles. Better still, its polycarbonate shell comes in various trendy colors, ranging from Rose Gold to Lemongrass. It’s reasonably affordable and features raised edges, guaranteeing screen safety against shattering, even during higher falls.
-

Google Case for Pixel 7
$23 $30 Save $7We basically stopped recommending Google’s first-party cases due to the poor quality of the Pixel 6 case, but Google turned things around with the Pixel 7. The Pixel 7 case is available in Black, Gray, and Lemongrass and made of thermoplastic elastomer, providing an understated look with nothing but the Google logo adorning the back. We’ve used this case in everyday life for half a year, and other than the usual scuffs from minor drops, it’s holding up well.
-
Spigen Slim Armor CS for Pixel 7
$20 $40 Save $20There are a few Spigen options for the Pixel 7, but this slimline, shock-absorbing armored case is a favorite. Not only is it a quality thermoplastic polyurethane protective shell that will save the device from impact, but it also sports a hidden credit card slot on the back. Granted, you’ll lose the option for wireless charging, but the convenience and peace of mind this case brings is worth sacrificing the underwhelming 12W charging speed.
-
Torro Leather Case For Pixel 7
If you’ve got it, flaunt it. Torro’s genuine leather wallet case isn’t just a phone protector but a fashion statement. It’s a wallet, a pocket-laden credit card holder that exudes style and sophistication, all while ensuring your phone remains intact and doesn’t shatter into a thousand beautiful glass fragments. With a concealed layer of flexible TPU for Pixel 7 protection, its leather exterior showcases your personality.
-
UAG Scout Case for Pixel 7
$15 $20 Save $5Hailing from Urban Armor Gear, you’d naturally expect the minimalist-inspired Scout Case to excel as a hardened phone shell. Happily, that’s the case, with nothing sacrificed to fancy visuals. It simply lives up to expectations, acing a military drop test by effectively preserving a Pixel 7. Safely wrapped in the Scout case, the phone remained unscathed following 26 consecutive falls from a height of 4 feet.
-
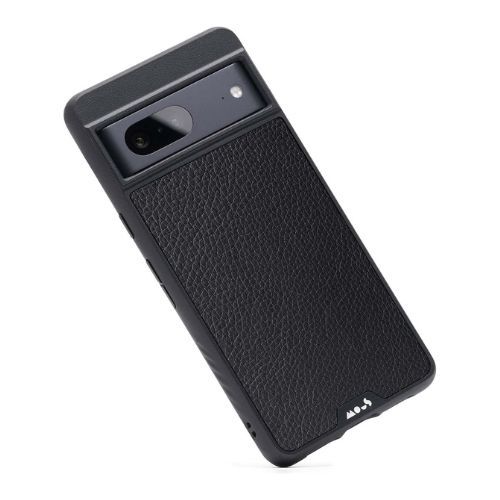
Mous Limitless 5.0 for Pixel 7
$49 $65 Save $16AiroShock impact absorbing is concealed beneath the Mous Limitless 5.0 walnut panel. Apart from that woody theme, there’s a handful of additional material designs, including Black Leather. Don’t forget the lifetime warranty, meaning that if you ever happen to harm its robust exterior, Mous will provide a complimentary replacement.
-
VRS Design Damda Glide Hybrid For Pixel 7
The Google Pixel 7 is a marvel of modern design; doesn’t it deserve an equal case? The Damda Glide Hybrid delivers just that. Built from heavy-duty polycarbonate, steel, and TPU, this case exudes innovation and convenience. It even includes a sliding credit card compartment and a kickstand, allowing you to enjoy your videos, safe in the knowledge that your payment cards are secure.
-
Ringke Fusion for Pixel 7
Another hard transparent case with soft TPU bumpers, the Ringke Fusion distinguishes itself by way of its hard plastic rear panel, which ensures that it won’t stretch over time and will continue to snugly fit your Pixel 7 for the rest of your phone’s life. It also employs the popular TPU/polycarbonate hybrid design to keep your phone safe and secure during drops.
-
Bellroy Leather Case For Pixel 7
$35 $49 Save $14Bellroy has made a name for itself with high-quality leather cases, and the company’s Pixel 7 lineup is evidence of its commitment to quality. Available in a range of colors that complement the phone perfectly, the Bellroy leather case is equally protective. A soft microfiber lining keeps the back free of scratches while the outer leather casing protects against falls.
-

Caseology Athlex for Pixel 7
$18 $27 Save $9Add some spice to your Pixel 7 with Caseology’s Athlex case. Sporting a molded grip, the case guarantees an incredible hold even when you’re out running. Alongside its texturized design, it has military-grade protection to shield your phone from impact. A microfiber lining also keeps the device’s glass back protected against scratches.
Keeping your Google Pixel 7 safe
Many great cases work wonders to keep the Google Pixel 7 safe, but three stand out among the rest. The best overall pick is Spigen’s simple-looking Liquid Air case. The brand delivers premium quality; it’s lightweight, streamlined, and has cushioning to give the Pixel 7 the protection it needs, even when dropped onto a hard surface.
The premium pick goes to a brand that often lands in this spot — dbrand. Dbrand’s cases are twofold. They’re capable of keeping devices like the Pixel 7 safe from drops and impacts while also providing a personalized touch with various designs. Choose a pattern that fits your personality and enjoy the military-grade drop protection made to prolong the life of your Pixel 7.
What do you do if you’re on a budget and still want the protection and elegance offered by the likes of Spigen? Check out Caseology’s Parallax case for the Pixel 7. It seamlessly blends style and substantial protection at an affordable price point.
Speaking of enhancing your time with your smartphone, a new case is just the start. Shop around for new accessories, like the Google Pixel Buds Pro or the Backbone One, to turn your Pixel 7 into a multimedia device.
Best Google Pixel 7 accessories in 2024
Get the most out of your new Pixel 7 or 7 Pro with these nifty accessories